One of the choices available to you for your final term project is an interactive game called Zombie Chase™. Everyone seems to love zombies these days: those brain-eating rascals from beyond the grave are popping up all over the place!
Zombie Chase™ takes place on a rectangular grid, with walls around the edges and/or impeding movement within: you can imagine it is a dark, abandoned warehouse, perhaps with a Michael Jackson soundtrack. Strewn about the warehouse are various fresh fruits: these are great nourishment for the living, but completely uninteresting to our zombie friends, because they only want to eat ... braaaiiins!!! Our hapless hero is a live human (controlled by the player of the game) whose job will be to move about the warehouse, collecting and eating the precious fruits, which have a restorative effect on her health, and avoiding the marauding zombies. The zombies will generally lurch around rather aimlessly, but they will pursue our hero and even attack her when they smell her nearby.
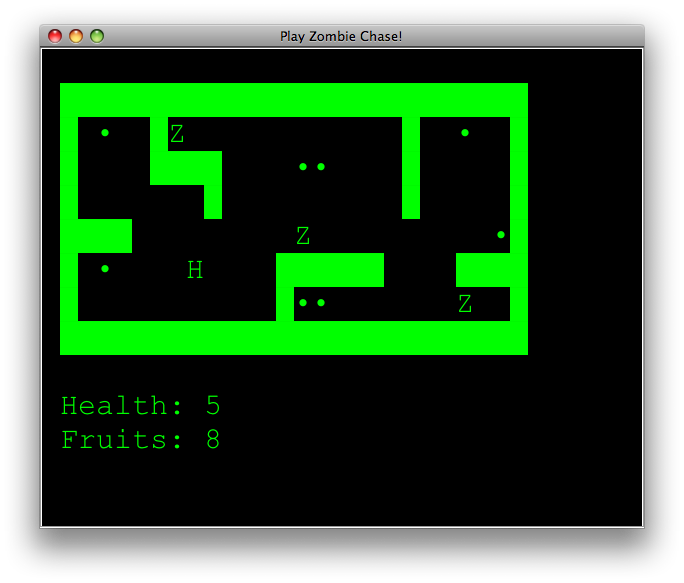
Of course, the game will look relatively primitive compared to modern 3D action games, but the idea is to have something you can program yourself with relatively little help. Here’s a snapshot from a version of the game under development for the assignment:
In order to make the project useful for your studies, you will implement the game in an object-oriented style, using Java classes. In order to make it easier to finish, you will work on it in three phases, due at different points toward the end of the semester. And finally, in order to make your game more original and personal, we will encourage you to add some kind of special feature such as weapons, trapdoors, zombie repellant, etc.
Coming soon!
The game includes a game board consisting of a rectangular grid of “cells”; the board will be represented in Java by a Board object containing a 2D array of Piece objects. The Piece class in turn will represent the various kinds of things that can be positioned at a place on the grid.
More specifically, pieces found in a grid cell might include:
In order to allow for variety of gameplay, and to facilitate testing of different game scenarios, we will allow game boards to be read in from a text file (this is similar to the notion of a “levels” that are loaded in and played on many games). When we read a board from a file, we can read it as a succession of rows of characters or as a sequence of strings. Each row or string represents one row of cells, with the characters coding the cell contents as follows:
By way of example, here is a typical board layout, corresponding to the board in the picture shown above:
##########################
# o  #z            #  o  #
#    ####    oo    #     #
#       #          #     #
####         z          o#
# o    h    ######    ####
#           #oo       z  #
##########################
In this first phase of the project, we will basically just read in a board and print it back out again. This may seem simple enough, but due to a relatively heavy use of objects and classes (see below) and some planning for later features, it should be challenging enough.
As mentioned above, part of the idea of this exercise is to get you acquainted with using Java objects and classes. Toward this end, we will suggest a design that uses these concepts fairly heavily: this isn’t necessary, as we might make do with just a 2D array of characters (for example) to hold the information for the game. But the use of objects and classes, once you master the concepts, will make it especially easy to organize the code, to add new features, and to avoid certain kinds of bugs.
If you haven’t read Chapter 7 of the Horstmann textbook, now is the time to do it! You may also want to browse through some of the basics of inheritance and sub-classes from Chapter 8: we’ll be discussing these topics soon in lecture.
The following diagram shows the basic design we will use: not all of this will be relevant to the first phase, but it will give you an idea where we are headed with the other two phases.
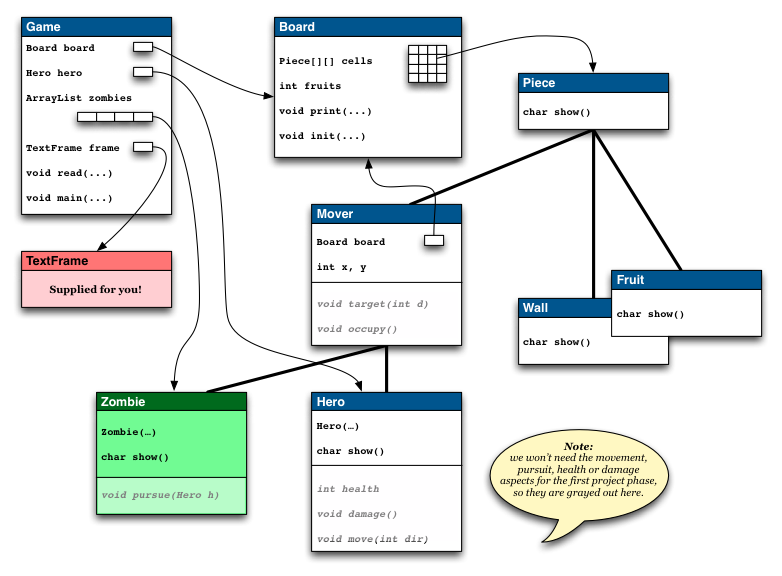
In the diagram, the boxes with tab/labels represent classes; the smaller boxes inside represent references to other objects (i.e., references stored in variables of class types, with the given variable names). The thin arrow links show the classes of the objects referenced. The heavy, dark lines, on the other hand, represent sub-class relationships, established with the extends annotation in Java. Finally, the typewriter font code inside the boxes represents the names of variables and methods that would be defined in the corresponding class.
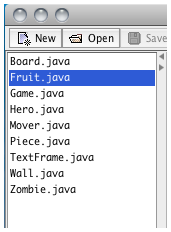
Note: this means that you will ultimately be working with several different class files simultaneously in Dr. Java. It’s possible that that you haven’t used multiple class files tied together in a single project in this way before now. You’ll want to load up all the files in Dr. Java, so they appear in the little project pane in the upper left-hand corner:
You’ll want to keep these files together in the same folder or directory as you work on them, since the game will need all the corresponding classes to run. You will probably also want to keep at least one data file with a test board in the same directory.
To start with, you’ll want to define the following classes and methods (one file per class, with methods defined inside the classes):
In order to read in the board from a file, you”ll want to use a Scanner, but with a Java File object as its source rather than the usual System.in. You should put a simple text file, like the one shown above, into the same directory as your zombie project files, then set it up for reading with code like this:
try
{
    Scanner scan = new Scanner(new File("testboard"));

    ...

}
catch (Exception e)
{
    System.out.println("Whoops! File reading failed!");
}Inside the “...” part of the code, you‘ll need to actually use the file scanner to read in the board. The basic idea is to read in one line at a time, going through each character in the resulting String, and using a switch statement to create any Pieces found at a given location. When a blank space (' ') is read in, a null reference can be left in the array, since that is the easiest way to represent the fact that “nothing” is in the corresponding cell (it is also easily checked later for allowing moving pieces to move into a cell, since you can just test for cells[i][j]==null). In any case, for non-null array cells, i.e. when a character representing a wall, fruit, zombie or our hero is found, the corresponding case of the switch statement can just create a new Piece of the appropriate sub-class by calling its constructor. For Fruit and Wall pieces, no additional information is needed, ie., a default constructor will do. For moving pieces, i.e. Zombie and Hero sub-classes of Mover, the constructor will need to be called with a reference to the Board variable and with the int array coordinates (e.g., i and j, or whatever), so that the Mover piece can later inspect nearby board cells and modify its own location (i,e., move).
(Note that the constructors for Zombie and Hero sub-classes of Mover can take advantage of a common super-class constructor by calling super(...) with appropriate parameters: this is because both of these sub-classes are initializing the same variables, as already defined in the Mover class, specifically the board reference and the Mover’s coordinates.)
A subtle point here is that the Board instance itself must be created first, before the individual pieces in the cells array are created, so that a reference to the board can be passed in to the Mover pieces. I solved this problem by making a new Board() first, before the reading loop, then filling in the array of cells, and then finally initializing the Board’s cell array in a separate step. (It might also be possible to allow the Board to construct itself and pass a reference to itself to the Movers using a “this” reference, but I haven’t verified myself that it all works out.)
There are a number of design choices choices to be made at this stage:
Once you have the board read in, it is pretty simple to print it out: just go through the 2D array of cells with a nested for loop, and print either a blank space (for null cell values, or print a character obtained by calling the show method of the Piece contained in the cell.
You could do this by printing to System.out, but the Dr. Java interactions pane does not support larger type, color or Unicode characters as well as some other interfaces do. More specifically, we have supplied you with a Java class file called a TextFrame which will create a separate window into which you can write your output: by default it will use the large type, green on black style shown in the game snapshot at the top of this file. You can find the code here:
TextFrame.java
To use this code, just declare and construct a new TextFrame instance, passing it parameters for the title and size of the window; I used the call:
private static TextFrame frame = new TextFrame("Play Zombie Chase!", 600, 550);for the window shown above. (You may want a wider or taller frame if you have a bigger level map—you might even compute the size of the frame from the size of the level, after some experimentation to determine the appropriate constants.)
Once you have a TextFrame, you can print to it almost like the System.out console you’re used to from class; but note that we only support the following method calls:
If you need to add some variation on the methods above that’s missing, it should be easy to modify the code: look at the source to see how it’s done.
Given the declaration above, you might write something like this in order to print out a specific cell:
frame.print(cells[i][j].show());
(Note that you can’t do this if the value of cells[i][j] is null: you”ll get a NullPointerException if you try. So this code should most likely occur as one branch of an if statement that checks for a null cell, and prints a blank if it finds null.)
Finally, you might want to use Unicode characters to represent some of your pieces, as I did with the Wall and Fruit pieces in the screenshot at the top of the page. You can use '\u2588' for the “full block” character I used for walls and '\u2022' for the bullet character I used for fruits. You can find other Unicode characters in many reference charts on-line; this one at charbase.com is pretty nice: just click on a likely symbol, then navigate using the left and right arrows near the top left and right of each page, or click on the Block link to see a list of similar characters. You can then use the Java Escape version of the code in your program, but with single quotes instead of double ones (i.e., a char instead of a String). You should note, however, that not all Unicode fonts obey the monospaced width that makes the output line up properly, and certain characters may not be available in some fonts.
Okay, let’s assume you have a game board already read in and constructed: now it ’s time to get your pieces to move!
Recall that we made a Mover class to consolidate the code used to move pieces: this will be a sub-class of the Piece class, but also serve as a super-class of the Hero and Zombie classes. In other words, you need to annotate the class headers of the various classes as follows (remember, these will all be in separate files):
class Piece { ... }

class Wall extends Piece { ... }

class Fruit extends Piece { ... }

class Mover extends Piece { ... }

class Hero extends Mover { ... }

class Zombie extends Mover { ... }
In the Mover class, we’ll put code that has to do with movement, but in particular that which is common to both the hero and the zombies. For example, since both of these kinds of pieces will need access to the game board and each will have a current position, we can put variables in this class holding a reference to the Board object and two int variables.
In my code, I also put two methods in the Mover class, one to target a given direction, and one to occupy the targeted position; in between calls to these methods, the target coordinates are stored in a separate pair of integer variables. The reason for this approach is that it allows the hero and the zombies to “plan” a movement in one step, and then actually move only when they have determined that the move is possible, i.e., not blocked by a wall or some other piece. (In the case of the hero, a fruit will not actually block movement, but the Fruit piece needs to be “consumed”, i.e., replaced on the board.)
By the way, you'll need to make sure that when you construct Hero and Zombie objects to populate the board, that you also store them somewhere accessible to the main method of the game. Why? Because the main method will need to allow the hero and the zombies a chance to move with each turn, the hero by user input and the zombies by random lurching (or later by more purposeful pursuit). I used variables in the Game class corresponding to the hero (of type Hero) and a bunch of the zombies (it’s probably easiest if this is of type ArrayList<Zombie>). You might also put these variables/object-references in the Board class, but remember that they will need to be available in any case to the main method that runs the game.
Overall, the game should proceed roughly as follows:
OK, let’s tackle the movement of each kind of piece: the hero will move by user input, so you will need some sort of call to a Scanner in an outer game loop. (If you know about KeyListeners and inversion of control, you might be able to enhance the TextFrame to allow more direct keystroke entry, but we won’t be discussing these advanced topics in lecture.)
What sort of commands should you use for hero movement? There are a lot of possibilities here, but note that the arrow keys usually generate a more complex sort of input than just a single character. You could use some of the letter keys to stand for the various directions (in which case a switch statement would work well), but I found that the easiest and most workable thing was to use a grid based on the numeric keypad:
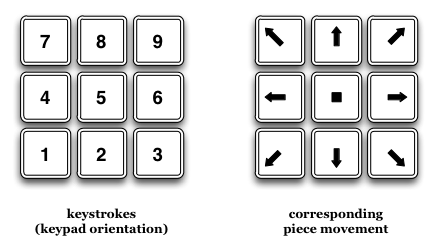
(Mine actually uses an upside-down version based on the way the keys on a phone are arranged.)
You can convert a numeric input into x- and y-coordinate offsets as follows:
In my design, the conversion between an integer direction (between 1 and 9) and a couple of x and y offsets is done on the target method of the Mover class: this allows me to then check the intended move from the Hero class before actually occupying a new cell of the board. Specifically, we need to check what sort of value is in the target cell: walls should block movement (as should zombies!), but a fruit should instead be consumed. I let the move method of my Hero class replace a fruit-occupied cell with a null value before calling the generic occupy method from the Mover super-class. When the hero “eats” the fruit, he gains in health and reduces the global fruit counter by one ... but the occupy method is responsible for preventing a move onto an occupied cell or allowing a move onto a null cell (including the case where a fruit has just been consumed).
What about zombie movement, then? Well, a simple version is now quite easy: just roll a nine-sided die (using code from earlier in the semester) for each zombie in the ArrayList of zombies, and have the target method convert this into a potential movement; then use the occupy method to actually make the movement, if it is allowed.
Of course, this doesn’t lead to very interesting zombie behavior, since it won’t allow for pursuit of or damage to our hero, but that’s what the next section is for ...
In this phase, we’ll add more purposeful movement by zombies and a new feature of your own design.
In order to make the zombies more of a threat, and thus add playability to the game, we should make them do more than just randomly lurch around. In my version of the game, zombies can “smell” the hero from as much as 2 squares away (measured very roughly) and will move toward the hero when they do. They also attack the human hero whenever they are adjacent to her, causing damage to her “health” score (the same score which is in turn increased by her eating fruit).
In order to implement this behavior, you’ll have to modify your zombie movement method to add some new behavior. You’ll also need to add the health-based effects of both fruit consumption and zombie damage. Finally, you’ll need to add logic to your game that allows for a win or loss depending on whether the hero gathers and consumes all the fruit before the zombies strike her down.
Let’s consider the health effects first, since those are probably the easiest: you can add an integer variable for health to your Hero class (this should be a non-static member, since we want it to be associated with each Hero instance, important if you later expanded to a multi-player version of the game). You would then increase this variable by one (say) every time the hero consumes a fruit: this would presumably be in the Hero class movement code, where the hero takes over a fruit-occupied cell.
Getting zombies to smell the hero could be done in a number of ways, but I found that the
easiest was to have the Game class method that implements the main play loop
(this might very well be your main method) pass its reference to the hero to
each zombie that it moves. That is, in the main play loop, when you move the hero (or rather
when the player does) and then move through the ArrayList of zombies to move them
in turn, pass in the hero variable that the Game class uses to track and move the
hero to each zombie as it moves. I renamed my zombie movement method and gave it a
Now, given that both heros and zombies are instances of a sub-class of Mover, they will both have some integer coordinates (say x and y) that they use to keep track of their position on the board. You can use these coordinates to determine the distance between a zombie and the hero he pursues, either by using a classical distance formula (the square root fo the sums of the squares of the coordinates) or perhaps something similar but easier to compute. I actually just asked if the absolute value of the differences of both coordinates was less than my “zombie smell range”, which I set to 2 board units. (You could of course use a different value, or even manipulate the value or calculation to reflect some new aspect of the game; for example, perhaps the hero can pick up some item that obscures his scent from the zombies, or even actively repels them when within range.)
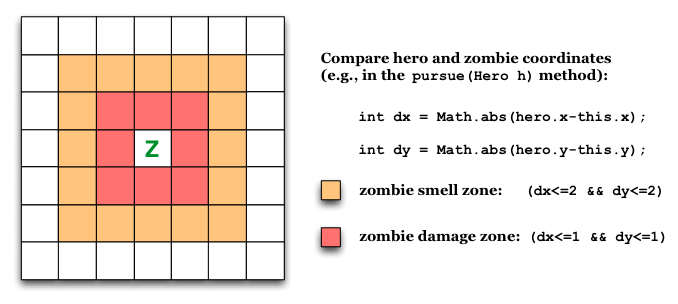
Now a simple if statement can allow your zombie to take action when it smells the human (i.e., when the distance calculation returns a small enough value): just target the human in the zombie’s movement by subtracting the corresponding coordinates to get target movement values for each of the x and y directions. Of course, if your zombie smell range was high enough, this simple strategy might have your zombie bouncing off a wall between him and the hero, rather than going around it, but then zombies aren’t exactly known for their smarts (just their need for braaaiiins!).
If your zombe doesn’t smell your human, you can use the else part of the statement to revert back to your default behavior (for my zombies that just meant “rolling” a 9-sided die to move randomly using the same number-based direction system that the hero player movement used).
Once your zombie has moved, no matter what the mechanism, you could now check to see if he is close enough to the hero to do damage: my zombies have to be directly adjacent to the hero (i.e., the absolute value of the difference of both coordinates must be less than or equal to one), but you might reasonably allow for a slightly looser policy (maybe your zombies have long arms because they were police officers in their earthly lives ...). In any case, since you have passed a reference to the hero in from the Game class method to the zombie, you can then have the zombie reduce the hero’s health at the time of damage to reflect the attack. (Presumably you would do this by having the zombie call a Hero class method to inflict the damage: modifying a private health variable directly is probably not the “polite” way to proceed!).
Now, once you have fruit-based health increases and zombie-based damage (i.e., health decreases) in effect, you can use the hero’s health as a basis for winning or losing the game. In my game, the hero wins if she collects all of the fruits before the zombies reduce her health to zero: you may want to use different criteria, but in any case you should be able to check these conditions in a while loop that drives the main game play from your Game method. If you use a compound condition (e.g., “while there are fruits left and the hero is still healthy”), you should probably check which condition stopped the loop immediately (or at least very soon) after the loop finishes, in order to determine how to proceed: my game just prints out a winning or losing message, but it’s also traditional to give the user some sort of treat (perhaps a TextFrame/clear method-based animation, or some Unicode-character-based “ASCII art”).
In any case, do remember to reduce the global number of fruits every time your hero consumes one, so that you’ll be able to tell when they’ve won the game, or to make similar changes to other variables if you use a different criterion. I used a global fruit count in the game board because I didn’t want to re-count all the fruits on the board each time I needed to check, but this means I had to update the count every time I created a fruit cell at board read-in time and then again whenever the hero consumed one. If you have different kinds of pieces or winning protocols, just ask yourself when it is most natural to update counters, boolean flags, or whatever, in order to best track the relevant properties.)
Finally, you may want to add some interesting “signature feature” to your version of the game: part of the joy of programming is the ability to implement your own vision and exercise your creativity on such a dynamic canvas. In the introduction above, I mentioned some ideas like trapdoors/teleportation, weapons and zombe repellant, but there is plenty of room for cool ideas here. You could even make a multi-player version of the game, using multiple instances of the Hero class and prompting separately for each player’s moves.
Just as an example, consider the idea of weapons that the hero can employ against the zombies—a shovel seems to be the weapon of choice for this purpose. You could
Many other game variations are possible. During development, I made a special version of the game for my younger daughter, who didn’t like the zombies much, by just changing the colors (tawny yellow) and characters ('L' instead of 'Z') used to make it into a “Lion Chase” game that was more acceptable to her aesthetics. Similar changes in color and characters, or even in other gameplay aspects, could yield games with different “themes”: red for vampires, grey for ghosts, blue for ice demons, etc.) You might even allow the user to choose from among such “themes” at the beginning of the game. (In this case you could use a Theme object to store the various components of the theme (color, window title, characters, messages, etc.) and then write your code so that it accesses a specfic Theme instance when selected.)
Of course, a really usable game would make use of a more sophisticated interface, for example allowing the player to use the numeric keypad, or capturing the keystrokes directly in the TextFrame rather than with a console-based Scanner. Adding these kinds of features is possible, but goes beyond the scope of this course. (If you are interested, you might look into KeyListeners, but be forewarned that setting this up requires a so-called inversion of control, in which the game is no longer structured as an overall loop embedded in a main method, but rather as a set of methods that respond to user inputs. This is a significant shift in perspective.)
I guess in the end your game could always be extended in some new and interesting way, so that it will always be:

(Special thanks to the folks at Zombies and Horror Movies.com for the use of their cool zombie clip-art!